Swirl nail designs are a beautiful way to turn an ordinary manicure into a tiny work of art. From soft pink curves and dreamy pastel waves to bold retro patterns and elegant nude swirls, these designs offer endless ways to express your personal style. Whether you love short natural nails, long almond acrylics, or trendy press-on nails, there is a swirl manicure to inspire your next look.
The best part? You don’t need to be a professional nail artist to try them. With a few favorite polish colors, a fine nail art brush, and a little patience, you can create flowing patterns at home.
In this guide, you’ll discover 15 beautiful swirl nail ideas, learn how to create swirl nail art step by step, and find simple tips for achieving a smooth, salon-inspired finish.
Table of Contents
- What Are Swirl Nail Designs?
- 15 Swirl Nail Designs for Inspiration
- What You Need to Create Swirl Nails
- How to Create Swirl Nail Designs Step by Step
- Tips for Perfect Swirl Nail Art
- How to Make Your Swirl Manicure Last
- Frequently Asked Questions
- Final Thoughts
What Are Swirl Nail Designs?
Swirl nail designs feature curved lines, wavy shapes, spirals, or flowing color patterns painted over a nail base. They can be delicate and minimalist or colorful and dramatic, depending on the shades and patterns you choose.
Unlike perfectly symmetrical nail art, swirls look lovely when the lines have a natural, flowing appearance. You can use one color for a simple accent or combine several shades for a playful, multicolored manicure.
These designs work beautifully on natural nails, acrylics, gel extensions, and press-on nails. They’re also easy to customize for different seasons, outfits, and occasions.
15 Swirl Nail Designs for Inspiration
Here are 15 ideas to save for your next manicure. Each design offers a different combination of colors, shapes, and finishes.
1. Pink and White Swirl Nails

Pink and white swirl nails are perfect if you love a soft, feminine manicure. The combination of milky white and blush pink creates a delicate, polished look that feels pretty without being too bold.
How to style them: Start with a pale pink base, then add flowing white curves. For a more detailed finish, outline one or two swirls with a fine gold line.
Best for: Everyday wear, romantic occasions, spring manicures, and bridal-inspired looks.
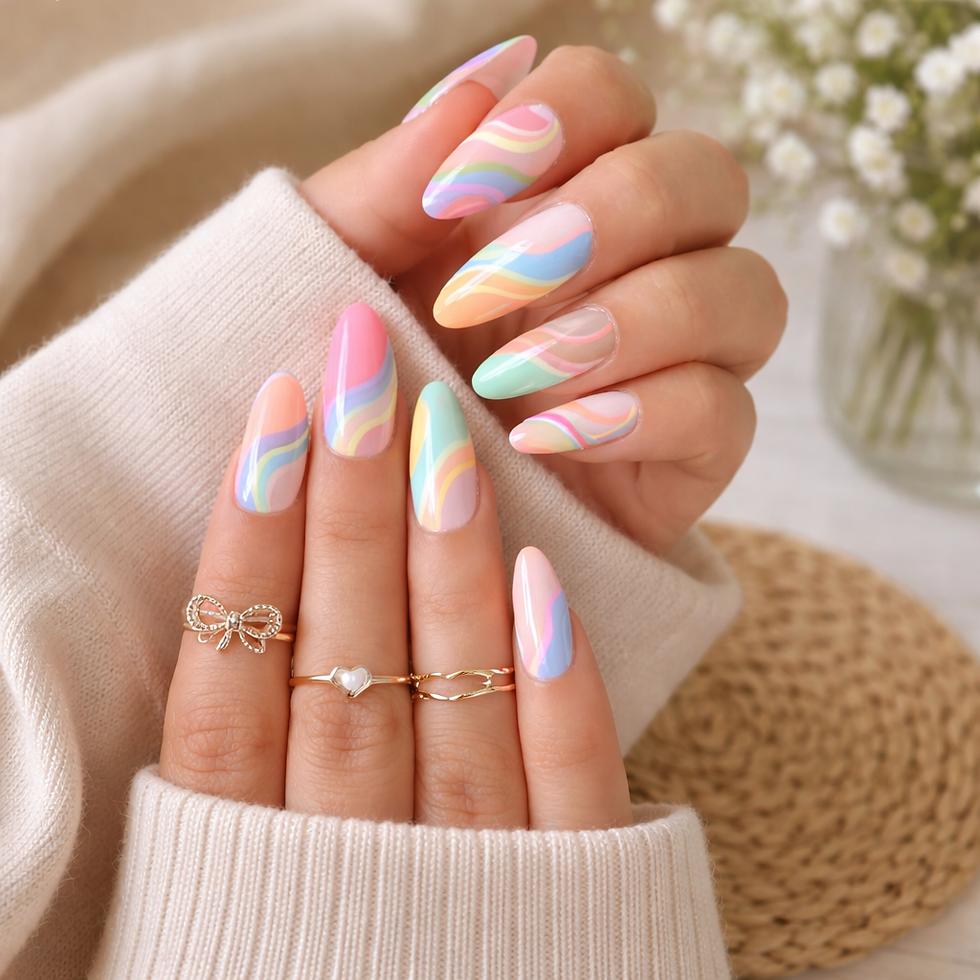
2. Pastel Rainbow Swirl Nails

Pastel rainbow swirls are ideal for anyone who loves cheerful colors. Lavender, mint green, baby blue, peach, and butter yellow create a dreamy combination that looks especially beautiful against a sheer nude base.
How to style them: Paint a different combination of pastel curves on each nail, keeping the overall palette consistent for a coordinated look.
Best for: Spring, summer, vacations, and playful nail art.
3. Brown and Caramel Latte Swirl Nails

Warm brown and caramel swirls create a cozy manicure inspired by creamy coffee shades. The mix of chocolate brown, beige, and ivory looks sophisticated while still adding visual interest.
How to style them: Apply a milky beige base and add alternating caramel and chocolate curves. Keep the lines slightly different on each nail for an artistic finish.
Best for: Autumn, winter, neutral outfits, and everyday elegance.
4. Blue and White Ocean Swirl Nails

Blue and white swirl nails bring a fresh, ocean-inspired feeling to your manicure. The flowing lines resemble rippling water and look beautiful with shades ranging from pale aqua to deep cobalt.
How to style them: Use a light blue base, then add white and darker blue curves. Leave a little negative space so the pattern stays crisp.
Best for: Summer holidays, beach trips, and bright daytime looks.
5. Nude Swirl Nail Designs

If you prefer understated beauty, nude swirl nails are an excellent choice. A sheer pink or beige base with delicate cream lines creates an elegant manicure that complements almost any outfit.
How to style them: Draw one or two thin white swirls on each nail instead of covering the entire surface with color.
Best for: Office wear, minimalist style, special occasions, and everyday manicures.
6. Black and White Retro Swirl Nails

Black and white swirls offer a bold, graphic look inspired by retro patterns. The high contrast makes even a simple wave stand out.
How to style them: Alternate black and white curved lines over a pale base, or use a black base with white waves for a dramatic effect.
Best for: Statement manicures, parties, and modern fashion looks.
7. Green and Cream Swirl Nails

Sage green and cream make a lovely combination for a natural, relaxed aesthetic. These colors feel understated yet distinctive, especially when paired with a glossy finish.
How to style them: Combine sage, ivory, and a touch of muted olive. Try placing the swirls diagonally for a flowing design.
Best for: Autumn, spring, neutral wardrobes, and minimalist beauty lovers.
8. French Tip Swirl Nails

French tip swirl nails combine the timeless look of a French manicure with creative curved details. They’re a beautiful option if you want something more interesting than traditional white tips.
How to style them: Create a classic French tip, then draw a thin curved line from one side of the nail toward the tip. You can also replace the straight tip boundary with a wavy line.
Best for: Weddings, celebrations, elegant everyday looks, and special occasions.
9. Purple and Lavender Swirl Nails

Lavender and purple swirls create a dreamy manicure with a little extra personality. Combining pale lilac with a deeper violet shade gives the design dimension without making it feel too busy.
How to style them: Start with a pale lavender base and add deeper purple curves. A touch of pearly polish can make the design look luminous.
Best for: Spring, parties, birthdays, and pastel nail lovers.
10. Chrome Swirl Nail Designs

Chrome swirls add a reflective finish that catches the light beautifully. Silver, pearl, and gold details can make a simple base look more luxurious.
How to style them: Apply your base color, then add metallic curved accents using suitable nail art products. Chrome powders generally require the appropriate gel system and application technique.
Best for: Evening events, glamorous outfits, and statement manicures.
11. Neon Swirl Nails

Neon swirl nails are made for anyone who enjoys bright, energetic colors. Hot pink, electric blue, lime green, and orange create an eye-catching design.
How to style them: Use a white or nude base to help the bright shades stand out. Apply thin, curved lines in different colors and avoid overcrowding each nail.
Best for: Summer festivals, holidays, parties, and bold personal style.
12. Short Square Swirl Nails

Swirl nail art looks just as lovely on short nails as it does on long extensions. Short square nails are practical, neat, and easy to maintain.
How to style them: Use a sheer pink or milky base and create one narrow S-shaped line on each nail. Keeping the design simple helps the shorter nail surface look balanced.
Best for: Everyday wear, school, work, and low-maintenance manicures.
13. Sunset Swirl Nails

Sunset swirls combine warm shades that resemble the colors of an evening sky. Coral, peach, pink, and purple create a beautiful gradient-inspired effect.
How to style them: Use a light peach base and layer curved lines in pink, coral, and violet. Keep the colors distinct for a clean, flowing pattern.
Best for: Summer evenings, vacations, and colorful outfits.
14. Glitter Accent Swirl Nails

Glitter accent swirls offer a delicate way to add sparkle without making the entire manicure glittery. Rose gold, champagne, and silver work especially well with nude and pink bases.
How to style them: Paint your main swirls first, then add a thin glitter line alongside one or two curves. Keep the glitter accents light and intentional.
Best for: Weddings, holidays, parties, and glamorous occasions.
15. Mix-and-Match Swirl Nails

Mix-and-match swirl nails let every finger have its own personality. You can combine waves, double curves, spirals, and simple accent lines while using a consistent color palette.
How to style them: Choose three or four complementary shades. Give each nail a different pattern, but repeat at least one color throughout the set to tie the design together.
Best for: Creative nail lovers, Pinterest-inspired manicures, and anyone who enjoys unique nail art.
What You Need to Create Swirl Nails
Before starting your manicure, gather a few basic supplies.


7
- Nail file and gentle buffer
- Base coat
- Your preferred base-color polish
- Two or three swirl colors
- Fine nail art liner brush or detailing brush
- Glossy or matte top coat
- Nail polish remover and a small cleanup brush
- Cuticle oil for use after the manicure
For gel polish, you’ll also need a compatible UV/LED lamp and products designed for that system. Follow the manufacturer’s curing instructions, and avoid getting uncured gel on your skin.
How to Create Swirl Nail Designs Step by Step
Follow this beginner-friendly tutorial to create a classic pink-and-white swirl manicure at home.
Step 1: Prepare Your Nails

Remove old polish, gently shape your nails, and clean away dust. Lightly buff only if appropriate for your nail type and chosen product. Make sure your nails are dry and free from oily residue before applying polish.
Tip: Almond, oval, and square shapes all work well. Choose the shape you find most comfortable.
Step 2: Apply Your Base Coat and Base Color

Apply a thin layer of base coat and allow it to dry, or cure it according to the product instructions if using gel. Follow with one or two thin coats of your chosen base color.
A sheer pink, milky white, or nude beige shade makes a beautiful background for swirl nail art.
Allow regular polish to dry completely before moving on to the next step.
Step 3: Draw Your First Swirl
Dip a fine liner brush into your first swirl color. Remove excess polish and gently draw a curved line across the nail.
Start with a simple S-shape or a soft wave running from one side of the nail toward the other. Use light pressure and move slowly enough to control the curve.
Beginner tip: Practice your line on a piece of paper or a nail art palette before painting your actual nails.
Step 4: Add a Second Color

Add a second line in a complementary shade, such as white over pink or lavender beside mint green. Follow the first curve loosely, leaving a little space between the lines.
You can make the second swirl thinner or thicker for contrast. Try not to add too many lines, because the design looks more defined when each curve has room to stand out.
If you’re using regular polish, allow the first lines to dry enough before adding more detail.
Step 5: Refine and Seal the Design

Check your lines and gently correct small mistakes with a fine cleanup brush and suitable polish remover before sealing the design.
Once the polish is fully dry, apply a compatible top coat to add shine and protect your artwork. If using gel, cure each layer as directed by the manufacturer.
Finish by applying cuticle oil around the nails, avoiding contact with uncured gel products.
Your pink-and-white swirl manicure is complete!
Tips for Perfect Swirl Nail Art
You don’t need perfectly steady hands to create beautiful swirl nails. A few simple techniques can help you achieve a cleaner finish.
- Use a fine brush: A liner brush gives you more control over thin, flowing lines.
- Start with fewer colors: Two complementary shades are easier to manage than a complicated palette.
- Keep the polish thin: Too much product can create bulky lines or uneven patterns.
- Rotate your finger: Adjusting the angle of your finger can make it easier to draw a smooth curve.
- Leave negative space: Bare or sheer areas help the design look modern and balanced.
- Practice on one nail first: Once you’re comfortable with the pattern, repeat it across the remaining nails.
- Don’t chase perfect symmetry: Slight variations give abstract nail art its individual character.
How to Make Your Swirl Manicure Last
A beautiful manicure deserves a little care. To help your swirl nail designs stay neat for longer, follow these habits:
- Begin with clean, dry nails.
- Apply thin, even coats instead of thick layers.
- Use compatible base coats, polish, and top coats.
- Allow regular nail polish to dry fully between layers.
- Avoid picking at the polish or using your nails as tools.
- Wear gloves when cleaning or washing dishes for extended periods.
- Apply cuticle oil regularly to keep the surrounding skin feeling moisturized.
If you’re using gel products, cure them correctly and avoid applying them to the skin. Remove gel or artificial nails according to the product’s instructions rather than peeling them off.
Frequently Asked Questions
Are swirl nail designs easy for beginners?
Yes! Start with a nude base and one or two simple curved lines. You can add more colors and details as your brush control improves.
Can you create swirl nail art on short nails?
Absolutely. Short square, oval, and rounded nails look beautiful with minimalist swirls. Thin lines and simple patterns are especially effective on smaller nail surfaces.
Which colors look best for swirl nails?
Popular combinations include pink and white, blue and aqua, brown and caramel, nude and cream, black and white, and pastel rainbow shades. Choose colors that complement each other and match your personal style.
Can I create swirl designs on press-on nails?
Yes. You can paint swirl designs directly onto suitable press-on nails before applying them, following the polish or gel manufacturer’s instructions. This can make detailed nail art easier because you can work on a flat surface.
Should swirl nails have a glossy or matte finish?
Both work beautifully. A glossy top coat makes bright colors and metallic accents stand out, while a matte finish gives abstract patterns a softer, modern appearance.
How can I fix a messy swirl line?
If the polish is still workable, use a fine brush to refine the curve. For regular polish, wait until the affected area is dry before making corrections if needed. If the line is too thick, simplify the pattern rather than adding more details to hide it.
Final Thoughts
Swirl nail designs are a wonderful way to experiment with color, movement, and creativity. Whether you prefer delicate pink-and-white waves, cozy latte-inspired patterns, colorful rainbow curves, or bold retro designs, there’s a style for every mood and occasion.
Start with a simple pattern, choose shades you love, and give yourself time to practice. The beauty of swirl nail art is that every manicure can look a little different, making it easy to create a style that feels uniquely yours.
Save your favorite ideas, try the step-by-step tutorial, and let your next manicure become your own little work of art.